# Common features
# Accessing the system
# Overview
The LTPS sign-in page and any published public levy estimator or provider levy estimator pages can be viewed by anyone with the URL.
Supporting general information about the domestic TPS is also available from the VET and Higher Education sections of the TPS website (opens new window). Users must sign in to the system to access any other LTPS system pages or complete any tasks (with the single exception of the public and provider levy estimators noted below).
At this stage, only internal staff in the TPS business and IT teams will log into the system. The TPS Director is a special category of user. While not an employee of the department, the TPS Director has access to the majority of the employee IT network and so has characteristics of both an internal and external user.
Providers will only access the system to view their levy estimate via an emailed link. This will not require a login.
In line with the department's technology strategy to standardise business system operations, LTPS user details and roles are stored in the PRISMS (opens new window) system. PRISMS is also where most LTPS user management is performed, although some basic functions like viewing user details and password changes are available within the LTPS system. What users can do after signing in to the LTPS system, depends on the LTPS role they have been assigned in PRISMS, as well as the permissions that have been applied to that role within the LTPS system.
# Who can access the system?
Anyone with the URL can view the LTPS sign in page and any published public levy estimator or provider levy estimator pages. Only users with an active PRISMS user account that has been assigned an LTPS role can sign into the LTPS system.
# How do they access the system?
Users can access the LTPS system by signing in at the following locations:
- Production https://levies.tps.gov.au (opens new window)
- PreProduction https://ltps.idc.hosts.pprodnetwork (opens new window)
- Demonstration https://ltpsdemo.idc.hosts.testnetwork (opens new window)
- Test https://ltps.idc.hosts.testnetwork (opens new window)
- Development https://ltps.idc.hosts.devnetwork (opens new window)
# Obtaining an LTPS user account in PRISMS
The first step to accessing the LTPS system is to get a user account in PRISMS (opens new window) with an assigned LTPS role.
New LTPS business users can self-register for a new PRISMS account at https://prisms.education.gov.au/Logon/Register.aspx (opens new window) by:
- selecting the Register (new access) link
- selecting the Commonwealth Government Department/Authority/National Regulator (Government officer) user type1
- selecting the Department of Education - Browse organisation access type2
- entering the remaining required personal details
- submitting the request to the relevant Registration Signatory Delegate for approval.
1The Fund Manager Assurance/Fund Manager User (TPS User) PRISMS user type can also be used for LTPS user access. For example, for the TPS Director.
2Most LTPS users will register for PRISMS browse access, but some LTPS users may register for the Department of Education - Administrator organisation access type if they will have any cross-team LTPS/PRISMS administrator duties.
Alternatively, a PRISMS Administrator can also create a new account on behalf of a user. This would usually be done by someone from the PRISMS Helpdesk team - prisms@education.gov.au.
New LTPS business users with an existing PRISMS account can obtain LTPS system access by a having a PRISMS Administrator add the appropriate LTPS business role to their account in PRISMS.
New LTPS IT Administrator users must have a PRISMS System Administrator account created for them by an existing PRISMS System Administrator user with the LTPS IT Administrator role.
Once the PRISMS user account has been created and approved by the delegate (if required), it must also be assigned an LTPS role: for business users this will be either the LTPS Officer or LTPS Administrator role, while IT users must be assigned the LTPS IT Administrator role.
After this has been done, the account will be activated and users should receive an email from PRISMS with the account details and be able to sign in to both the PRISMS and LTPS systems. Note that at present the PRISMS email refers only to accessing the PRISMS system.
For access in lower system environments other than the Production environment (for testing purposes), all users will have to request a member of the PRISMS IT team to create/update a PRISMS account with the appropriate LTPS role on their behalf.
# Signing in
Users can sign in by going to the LTPS sign-in page and entering their PRISMS account email address (logon ID) and password.
In the lower environments only, users can also use a testing tool to sign in as a sample user account of the various types.
Once signed, in the user's logon will remain valid for 24 hours unless they sign out, even if they close their browser or lock their PC.
After signing in successfully, users are taken to the Home page.
All signed-in users can view their user account name and email address, change their password, and can by default, view most of the system. The other functions available will depend on the LTPS role assigned to the user account in PRISMS, as well as the permissions applied to that role within the LTPS system. All users with the same role have the same permissions.
# Problems signing in
# Forgotten password
Users who have forgotten their password can request a password reset using the PRISMS page: https://prisms.education.gov.au/Logon/ForgottenPassword.aspx (opens new window)
PRISMS will send a new temporary password in an email which must then be changed. The PRISMS Help Desk can also reset passwords manually (or in the lower environments, contact the PRISMS IT team).
Resetting a password will reset the password in both the LTPS and PRISMS systems.
# Expired password
PRISMS/LTPS passwords automatically expire after 365 days. The LTPS system will force users who try to sign in with an expired password to change their password before they can access any other system functions.
Changing a password will change the password in both the LTPS and PRISMS systems.
# Pending account
New PRISMS/LTPS user accounts remain at Pending (Registered) status until the request is approved by a delegate and/or the account has been activated by an administrator. This can take up to five working days. Further information is available on the PRISMS site at https://prisms.education.gov.au/Logon/Register.aspx (opens new window) or from the PRISMS Help Desk.
# Locked account
PRISMS/LTPS user accounts automatically become locked after 5 consecutive failed sign in or change password attempts or 183 days of inactivity. Users should contact the PRISMS Help Desk to request an account to be unlocked (or in the lower environments, contact a member of the PRISMS IT team).
# Suspended account
A user account can be manually suspended in PRISMS by a PRISMS or System administrator if there is a need to temporarily prevent access. Users should contact the PRISMS Help Desk for assistance with suspending or suspending an account.
# Inactive account
PRISMS and LTPS user accounts can be manually inactivated in PRISMS by a PRISMS or System Administrator when there is a need to permanently prevent access. For example, when a staff member leaves the TPS Operations team. Users should contact the PRISMS Help Desk for assistance with inactivating or reactivating an account.
# Changing password
Users may be required to change their password if it has expired or may choose to do so themselves.
Users can change their password by clicking on their user name at the top right of the screen and selecting the Change password button.
Passwords must be between 7 to 50 characters, with at least 3 of the following character types: lower case, upper case, digit, symbol.
Changing a password will change the password in both the LTPS and PRISMS systems.
There is also a testing tool available under the Administration > Users menu in the lower environments to help with testing this function. For instance, it can be used to change an existing user's password expiry date and trigger the mandatory password change.
# Signing out
Users can sign out manually by clicking on their user name at the top right of the screen and selecting the sign out button.
Users will be automatically signed out 24 hours after signing in.
Because sign-ins remain valid for 24 hours even after closing the browser, user should always sign out if using a shared machine.
# Business rules
- The LTPS sign-in page and any published public levy estimator or provider levy estimator pages are available publically and can be accessed by anyone with the URL.
- LTPS users must sign into the LTPS system to access all other pages and functions.
- Users can sign into the LTPS systems at the following locations
- Production https://levies.tps.gov.au (opens new window)
- PreProduction https://ltps.idc.hosts.pprodnetwork (opens new window)
- Demonstration https://ltpsdemo.idc.hosts.testnetwork (opens new window)
- Test https://ltps.idc.hosts.testnetwork (opens new window)
- Development https://ltps.idc.hosts.devnetwork (opens new window)
- LTPS user accounts are stored in the PRISMS system
- Any changes made to a user account using the LTPS system must be reflected in PRISMS and vice versa
- LTPS business users must have a PRISMS user account of type Commonwealth Government Department/Authority/National Regulator (Government officer) (for internal departmental staff) or Fund Manager Assurance/Fund Manager User (TPS User) (for external staff) with the LTPS Officer or LTPS Administrator role
- LTPS IT users must have a PRISMS user account of type System Administrator with the LTPS IT Administrator role.
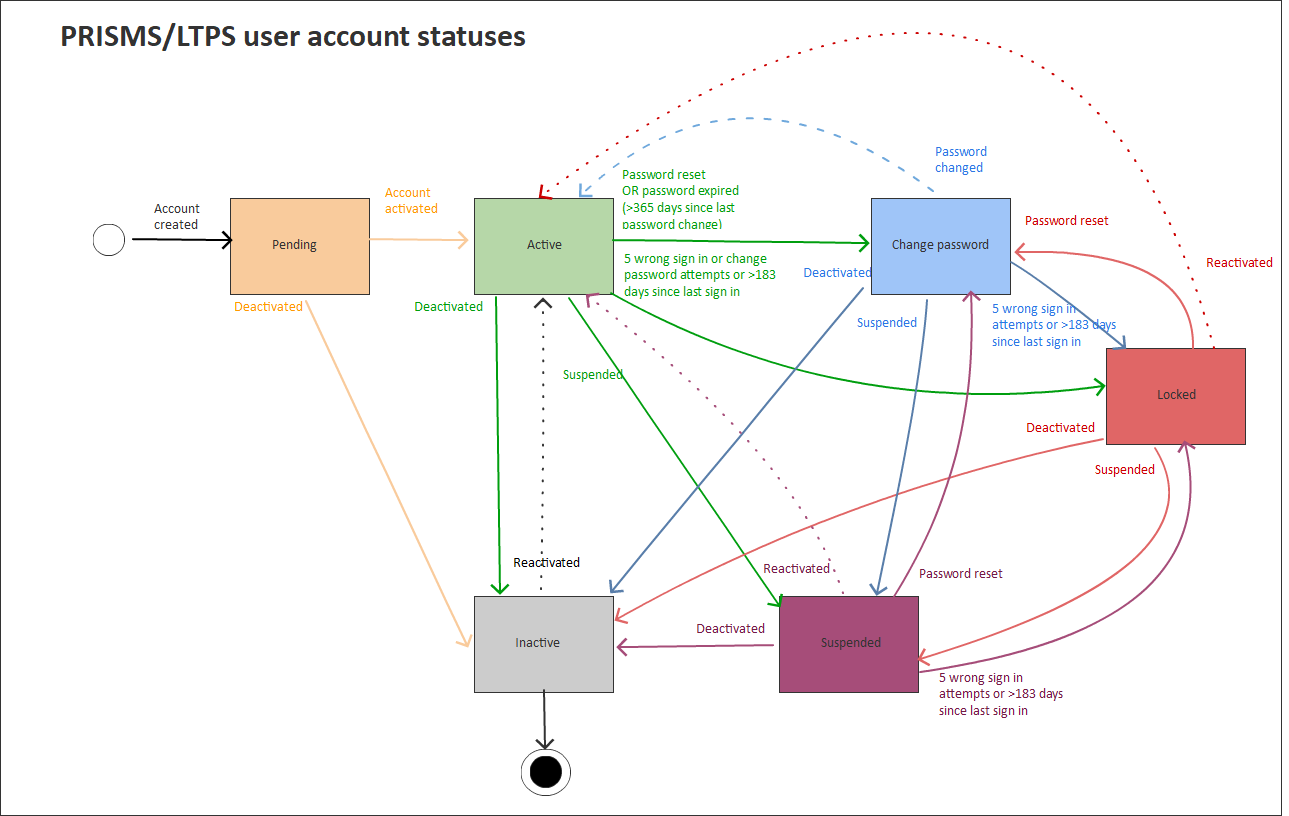
LTPS User accounts can have the following statuses (as per PRISMS): Pending, Active, Suspended, Change password, Locked or Inactive
| User account status | Trigger | Outcome of sign in attempt using correct credentials | Available status update paths |
|---|---|---|---|
| Active | Account will be at Active status if has been activated or reactivated in PRISMS | User will be signed in and taken to the Home page | Change password, Inactive, Locked, Suspended |
| Change password | Account will be at Change password status if it has been 365 or more days since the password was changed OR if it has been manually reset with a temporary password in PRISMS | User will be signed in but forced to change their password before they can access the rest of the system | Active, Inactive, Locked, Suspended |
| Inactive | Account will be at Inactive status if it has been manually deactivated in PRISMS | User will be denied sign in and referred to PRISMS Help Desk | Active |
| Locked | Account will be at Locked status after 5 consecutive failed sign in or password change attempts or after 183 days without signing in to the LTPS system or PRISMS. | User will be denied sign in and referred to PRISMS Help Desk | Active, Change password, Inactive, Suspended |
| Pending | Account will be at Pending status if it has been created but not yet activated in PRISMS | User will be denied sign in and referred to PRISMS Help Desk | Active, Inactive |
| Suspended | Account will be at Suspended status if it has been manually suspended in PRISMS | User will be denied sign in and referred to PRISMS Help Desk | Active, Change password, Inactive, Locked |
- Users must enter their PRISMS user account email address (logon ID)and password to sign in to the LTPS system
- In the lower LTPS environments (PreProd, Demo, Test, Dev) users can also use a testing tool to sign in as a sample user.
- Users will be denied sign in if:
- the email address is not a valid format
- the email address does not match a PRISMS user account (if a user's email is incorrect, they will only be told that their email or password is incorrect, not which one)
- the password does not match the PRISMS user account password (if a user's password is incorrect, they will only be told that their email or password is incorrect, not which one)
- their PRISMS account does not have an LTPS role (i.e. a user that only has access to PRISMS)
- their account does not have a status of 'Change password' or 'Active'
- their password has expired
- Unsuccessful sign-ins will be recorded in the system log and in the Exception logs at the Warning severity level.
After signing in successfully:
- the user will be directed to the Home page.
- the user's logon will remain valid for 24 hours (even if they close their browser or sign out of their computer), unless they sign out
- users can view their user account name and email address .
- users can change their password
- Access to any other functions is controlled by the LTPS role their account has been assigned in PRISMS, as well as the permissions that have been applied to that role within the LTPS system.
- Successful sign ins will be recorded in the System logs.
When signing in, users must change their password if their password expiry date has passed.
- Passwords expire 365 days after the previous password reset
- If a user is being forced to change their password, they will not be permitted to access any other system functions until they have completed their password change.
Users can change their password in PRISMS or LTPS. To change the password in LTPS:
- The user must be signed in
- The current password must be correct.
- The new password must be entered twice
- The two entries of the new password must match
- The new password must be at least 7 characters
- The new password cannot be more than 50 characters
- The new password must contain at least 3 of the following character types: lower case, upper case, digit, symbol
- The new password must be different to the current password
- The user's account will be locked after 5 failed attempts at changing the password
Users can sign out manually.
- Users will be automatically signed out after 24 hours of inactivity.
- After this happens, the next time the user requests some secure data (e.g. by navigating to the levy collection listing) they will instead be taken to the sign in page. After signing in they will be returned to the page they were trying to navigate to.
- After signing out, the user will be taken to the home screen and will no longer be able to access any internal screens or functions (including by using the back button).
- Sign outs will be recorded in the System log.
- Users can reset their password using the PRISMS password reset function (opens new window)
- Resetting a password will change the password in both LTPS and PRISMS.
# Navigation menu
The navigation menu is located at the left of the page.
On smaller screens it will automatically shrink to a smaller size. Clicking the hamburger menu icon at the top left of the page will toggle between larger and smaller views.
On mobile phone sized displays it will be hidden until the hamburger menu icon is clicked.
Options available to you in the navigation menu will generally depend on your access level.
Once you have opened a levy collection it will appear in the navigation menu.
# Listings / tables
Listings (tables) are the primary means of displaying collections of records in the application. Most listings have elements and behaviours that are common. These are described below.
# Sorting
If a table can be sorted by a particular column, then clicking on the column header will sort by that field in ascending order. Clicking it again will sort in descending order. If a table cannot be sorted by a particular column then it will not be possible to click on its column header. Tables with over 5000 records cannot be sorted unless a search reduces the number of records being displayed to less than the threshold.
# Paging
Listings that can contain a large number of rows are paged. At both the top and the bottom of the table are paging controls which allow you to move forward and backward through the list, or you can click on the current page number and type the number of the page you would like to go to.
# Results per page
At the bottom left of a table which has paging will be an area showing the number of results per page. Clicking on the number will allow you to adjust the results per page from 5, 10, 15, 20, 50, or 100.
# Searching
Most tables allow searching for records that match specific criteria. To search the table, click on the Search button.
- Tables that offer just a few search criteria will display all the available criteria.
- Tables that offer a large number of search criteria will include an Add more criteria button that can be used to select the type of criteria that you want to search with. If you find yourself often wanting to search by the same type of criteria you can click the pin button to 'pin' the criteria to the search dialog for next time.
Once you have performed a search the criteria you have chosen will appear as a collection of 'pills' above the search results. Click on a pill to revise search criteria, or click on the pill's 'X' button to remove a search criteria.
# Quick searches
Some tables offer a quick search function. Quick search takes the form of a text box that will search against one or more commonly used search criteria. e.g. the levy collection provider search will search by provider name (if text is entered), or by provider code (if a number is entered). To search, just type into the box then wait for a moment.
# Saved searches
If you find yourself frequently repeating the same type of search, you may want to consider using the Saved searches button to store your criteria for fast use again in the future. To create your own saved search:
- Perform your search.
- Click the Saved searches button, and then click Save.
- Give your saved search a name and hit enter.
Now that you have saved your search you can easily access it again in the future by clicking the Saved searches button and choosing your entry from the list. If you have many saved searches then you can edit, delete, or rearrange them using the buttons that appear when you hover over each saved search.
# Table options & actions
Most tables will display some options and actions toward the top right corner. Some of these will always be icons (e.g. the refresh button) and others will show text also (e.g. the export button).
# Go to first/last page
In addition to the pager control which allows you to navigate forward and backward through pages or to any particular page by typing in a number, the table menu contains fast actions for "Go to first page" and "Go to last page".
# Download results to Excel
Some listings support exporting your current results to Excel. If supported, then an Export button will appear. Clicking this will download a spreadsheet of results matching your current search criteria, but including columns of information that the on-screen listing doesn't have room for.
WARNING
There is a limit to the number of records that you can export at once. If you receive an error relating to the maximum number of records you can export at one time, try entering some criteria to narrow down the number of records in your list. It may be possible to (for example) break your listing up by dates and perform two exports which can be recombined in Excel.
# Expand/collapse all & allow multiple
If a table supports expanding rows then these options will become available. Normally only one row can be expanded at a time. The "Allow multiple" setting changes this so that you can have multiple rows expanded at the same time. You can also choose to quickly "Expand all" or "Collapse all" rows.
# Refresh
This will reload the table again. Tables will refresh automatically in response to your actions, but if other users are also working in the system this will allow you to force the system to load the latest data.
# Selecting or performing actions
If it is possible to view more detailed information about a record in a listing, then clicking the row will take you to those details.
Other actions may also be available for each record in the listing, such as Edit, Delete, or opening the details of the record in a new window or tab. When such actions are applicable they will be located at the rightmost column of the listing.
# History
All actions that result in a change to LTPS data are logged in the system logs. Most of these actions are also associated with the appropriate entity and are shown in a history tab when viewing the entity.
The history can be filtered by clicking on the search icon next to the history tab.
# Testing tools
Testing tools are available in some lower environments to allow testers to manipulate the data in ways that would not be possible normally.
NOTE
Testing tools are not available in the Production environment.
# Database rebuild
A database rebuild will delete the data and reseed it with a fresh set of sample data.
- Seed with basic information will seed the system with two empty 2019 levy collections. This is the option you will normally use for testing purposes.
- Seed with basic information, without providers does the same, but does not run a provider import. This option is useful if you want to test with a set of providers pulled from elsewhere (e.g. provider data pulled down from production and scripted into the LTPS database in a lower environment).
- Seed with some sample data, for use when automation testing seeds the system with a small amount of sample data. The automation tests that run on the build server each night use this option so they have a predefined set of data to work with.
# Clear data from levy collection
Wipes an existing levy collection clean so you can start again. This is quicker than a database rebuild and can be done to a single levy collection instead of blowing away the entire database.
# Seed invoices to match SAP test data
The SAP team have entered simulated payments against a set of invoices for us. Running this seeder will create matching invoice records the 2019 HELP levy collection which we can then use to test our SAP reconciliation. The levy collection providers for the invoicing scenarios will be marked as favourites so you can find them.
Before running this seeder, ensure that the 2019 HELP levy collection:
- Has had in-scope providers imported;
- Has had levy calculation parameters imported; and
- Is at the Invoicing status.
NOTE
This is quick and dirty - logging will be minimal and no business logic will be applied.
# Theme
Allows tinkering with different colour schemes. Refresh the browser to revert to the default theme.
# Users
Lists all LTPS users.
Click on the edit action button against a user to change certain details.
This allows you to test scenarios such as "when I sign in as a user who is required to change their password I expect to be taken to the change password screen".
# Other
Some other bits and bobs to assist with testing.
← Background Releases →